Japanese milk bread (Shokupan or Hokkaido milk bread)

Japanese milk bread, also known as Shokupan or Hokkaido milk bread, is a popular type of bread that has gained worldwide attention for its soft, fluffy texture and slightly sweet flavor. Unlike many traditional breads, this bread is known for its pillowy softness, making it perfect for everything from toast to sandwiches. If you’ve ever tasted it, you know how addictively delicious and comforting it is.
What Makes Shokupan Special?
The secret behind the exceptional texture of Japanese milk bread lies in its unique preparation method. This bread is made using the Tangzhong method, which involves cooking a portion of the flour with water or milk to form a smooth paste. This paste is then added to the dough, which results in extra moisture and creates that signature fluffy, airy crumb. The dough also contains ingredients like milk, egg, sugar, and butter, which add richness and a slight sweetness to the flavour.
The Tangzhong Method
The Tangzhong method is the key to the soft texture of Japanese milk bread. By cooking a mixture of flour and liquid (usually water or milk), the starches in the flour gelatinize. This helps retain more moisture in the bread, allowing it to stay fresh and soft for longer periods. The technique is commonly used in many Asian breads and is one of the reasons why Japanese milk bread is often referred to as “super soft” or “fluffy.”
Flavour
Japanese milk bread has a mild, slightly sweet flavour. Its richness comes from the butter and milk in the dough, while the sweetness makes it perfect for both savoury and sweet uses. You can enjoy it plain, as toast with butter and jam, or use it for sandwiches. Its soft texture makes it perfect for grilling or toasting without becoming too crunchy or hard.
How to Shape and Bake Hokkaido Milk Bread?
Shaping Hokkaido milk breadrequires a bit of technique, but it’s simple once you know the steps. After the dough has risen and rested, you divide it into portions and roll each piece into a smooth ball. Then, each ball is flattened, folded, and rolled into a log shape. This technique gives the bread its layered and soft texture. After shaping, the bread is placed in a loaf pan for a final rise before being baked to golden perfection.
Treat yourself to the perfect balance of sweet, savoury, and creamy with Korean cream cheese garlic buns—soft, golden, and utterly irresistible!
Why You Should Try Japanese Milk Bread?
If you love soft, melt-in-your-mouth bread, Shokupan is a must-try. Its fluffy texture and slightly sweet flavour make it perfect for a variety of occasions, from breakfast to afternoon tea. It’s easy to make at home with the right ingredients, and once you experience the joy of pulling apart a warm, soft slice, you’ll understand why this bread is so beloved around the world.
Whether you’re a seasoned baker or a beginner, Japanese milk bread is a delightful project that will bring the taste of Japan right into your kitchen. You’ll love the results, and so will everyone who gets to enjoy it!
Soft and fluffy like Japanese milk bread, Pain de Mie is perfect for making light, delicious sandwiches or enjoying as warm, buttery toast.
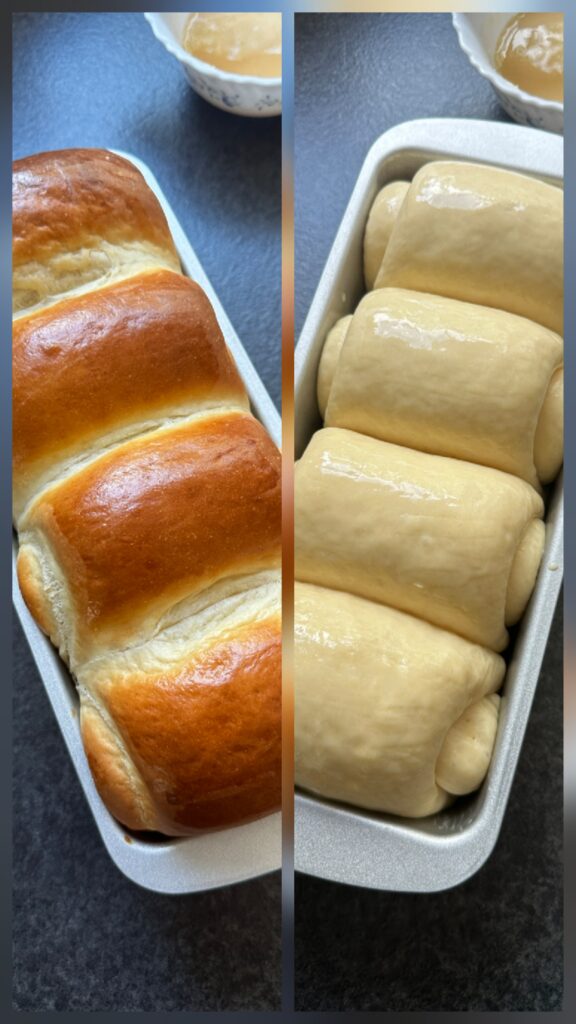
Before & after bake 🍞✨
Pillowy Japanese milk bread, soft risen dough… then fresh from the oven — golden, fluffy, and irresistibly cloud-like.


Japanese milk bread (Shokupan or Hokkaido milk bread)
Ingredients
Tangzhong (Water Roux)
- 3 tbsp water
- 3 tbsp milk
- 3 tbsp 25g bread flour
Dough
- 2 ½ cups 300g bread flour
- ¼ cup 40g sugar
- 1 tsp salt
- 1 tbsp instant yeast
- ½ cup 110ml whole milk, lukewarm
- 1 large egg
- ¼ cup 56g unsalted butter, softened
Egg wash
- 1 egg
- 1 tbsp milk
Instructions
Make the Tangzhong
- In a small saucepan, whisk together the flour, water, and milk until smooth.
- Then, stir the mixture over low heat until it thickens into a pudding-like consistency. This step helps gelatinise the starches, which gives the milk bread its signature soft and fluffy texture.
- Remove from the heat and let it cool to room temperature.
Make the Dough
- In a large mixing bowl, combine flour, sugar, salt, yeast and egg.
- Add the cooled tangzhong and mix until just combined.
- Then, with the stand mixer running on low speed, gradually pour in the lukewarm milk to ensure even hydration and a smooth dough.
- Knead the dough (by hand for 10-15 mins or stand mixer for 8-10 mins) until it becomes smooth and elastic.
- Gradually add softened butter and knead until fully incorporated.
- Place the dough in a greased bowl, cover, and let it rise for 1-1.5 hours (until doubled in size).
Shape & Second Rise
- Punch down the dough, divide it into 4 equal parts, each weighing around 161g (or adjust based on your pan size), and shape it into balls.
- Cover and let it rest for 10 minutes. This relaxes the gluten, making shaping easier.
- Shaping the dough correctly helps create the classic fluffy, pull-apart texture of Japanese milk bread.
- Take one of the rested dough balls and roll it gently into a rectangle using a rolling pin, about 6 inches wide and 8 inches long (adjust based on your pan size).
- Take one short side of the rectangle and fold it toward the centre.
- Then fold the opposite short side over it, like folding a letter.
- Lightly roll the dough out again to smooth it out slightly and elongate it.
- Starting from one short edge, tightly roll the dough into a log, similar to a cinnamon roll but without the filling.
- Note: Refer to the video for a visual demonstration of this step.
- Make sure the seam is on the bottom to keep it sealed.
- Place the shaped dough logs into a greased loaf pan, side by side.
- Cover and let them rise again for 45-60 mins (until puffy).
Bake
- Preheat the oven to 180°C.
- Whisk the egg and milk together until smooth.
- Use a pastry brush to lightly coat the top of the dough before baking.
- This will give the bread a shiny, golden-brown finish once baked.
- Bake for 25-30 minutes, until golden brown. If the top starts browning too quickly, gently place a sheet of aluminium foil over the loaf. This prevents over-browning while allowing the inside to fully bake.
- Once baked, let the bread cool in the pan for a few minutes, then transfer it to a wire rack to cool completely. Enjoy your soft, fluffy Shokupan!
- Enjoy your homemade Japanese milk bread—soft, buttery, and perfect for toasting or sandwiches!
Notes
Frequently Asked Questions
Japanese milk bread uses the Tangzhong method, where a cooked flour paste (Tangzhong) is added to the dough, creating extra moisture and a super soft, fluffy texture.
Yes! You can knead the dough by hand for 10-15 minutes until it becomes smooth and elastic. It takes more effort but gives great results!
This could be due to inactive yeast, cold room temperature, or not kneading enough to develop gluten. Make sure your yeast is fresh, and your dough is proofed in a warm place.
Yes, but bread flour is recommended because it has more protein, which helps create a chewy, fluffy texture. If using all-purpose flour, the bread may be slightly less chewy.
Store in an airtight container at room temperature for up to 3 days. For longer storage, freeze slices and toast when needed.
If the top is getting too dark before it’s fully baked, place aluminium foil over it during the last 10-15 minutes of baking.
Share Your Creations and Connect with Me on Social Media!
Have you tried this recipe? Don’t forget to tag me with your pictures on Instagram – I love to see your creations! 💕 Also, be sure to comment and rate below! Follow me on social media:
5 thoughts on “Japanese milk bread (Shokupan or Hokkaido milk bread)”