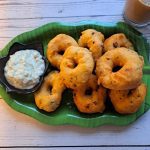
Medu vada/Ulundhu vada
Medu vada, also known as ulundhu vada, is a popular South Indian snack known for its crispy exterior and soft, fluffy interior. The Urad dal is soaked in water, ground to a smooth consistency and seasoned with spices. These vadas are traditionally deep-fried until golden brown. They are a staple in South Indian tea shops, where they are often served alongside hot chai.
Ingredients
1 cup = 250ml
- 1 cup whole white urad dal
- 2 tsp finely chopped ginger
- 1 green chilli adjust to your spice preference
- A few tablespoons of cold water or a few ice cubes
- 1 onion finely chopped
- A few curry leaves finely chopped
- ⅛ tsp hing/asafoetida
- Salt
- Oil for deep frying
Instructions
- Rinse the urad dal thoroughly, soak it in water and refrigerate for about 2.5-3 hours.
- Drain the soaked urad dal and grind it with a green chilly into a smooth batter using very little water or ice cubes. The batter should be thick and fluffy. You can use a wet grinder or a high-powered blender for this.
- When using a blender to grind the batter for Medu Vada, it's good to incorporate some air into the batter. This helps in making the vadas light and fluffy.
- After grinding the urad dal into a smooth batter, transfer it to a mixing bowl.
- Using a spoon or your hands, beat the batter vigorously for a couple of minutes. This whipping action helps incorporate air into the batter, making it lighter.
- You can also use a hand or electric whisk to beat the batter if you find it more convenient.
- Do a small test by dropping a small amount of batter into a bowl of water. If the batter floats, it's usually an indication that it's ready for frying.
- Add finely chopped onions, ginger, curry leaves, asafoetida, and salt to the batter. Mix well.
- Heat oil in a deep frying pan or a kadai over medium heat.
- Wet your hands, take a small amount of batter, and shape it into a round disc with a hole in the centre, forming a donut shape. (Read notes for more techniques)
- Maintaining the right oil temperature is important when frying vadas. If the oil is too hot, the outside can indeed brown quickly while the inside remains undercooked. Tip to test: Drop a very small ball of batter into the hot oil, it should sizzle and brown gradually rather than immediately turning dark.
- Gently slide the shaped vada into the hot oil. Fry until they turn golden brown on both sides. Make sure to cook them evenly by flipping them occasionally. Avoid overcrowding the pan with vadas.
- Once the vadas are golden brown and crispy, use a slotted spoon to remove them from the oil. Place them on a plate lined with paper towels to absorb any excess oil.
- Serve the Medu Vadas hot with coconut chutney or sambar.
- Enjoy your homemade Medu Vadas! They are commonly served as a breakfast item or snack in South Indian households.
Notes
- If you use a wet grinder to grind the urad dal, you can skip refrigerating the batter while soaking and adding ice cubes. The wet grinder generates less heat compared to other appliances like a blender, preserving the temperature-sensitive properties of the batter. However, if you're using a high-powered blender or another device that generates more heat during the grinding process, refrigerating the batter can help maintain its cool temperature.
- Incorporating air into the batter is especially important when using a blender, as it might not introduce as much air as a traditional wet grinder. This step contributes to the overall texture and fluffiness of the Medu Vadas.
- Maintaining the right consistency of the batter is important when making Medu Vada. A batter that is too watery can indeed make it challenging to shape the vadas, and it may absorb more oil during frying. When grinding the urad dal, start with less water and add more gradually if needed. The goal is to achieve a thick and fluffy batter. By paying attention to the batter consistency, you'll be able to create the perfect texture for your Medu Vadas – crispy on the outside and soft on the inside.
- Shaping the Medu Vada can indeed be a bit tricky, and using a tea strainer to achieve the donut shape is a clever technique. Smear some water on the backside of a tea strainer to prevent the batter from sticking. Place a ball of batter on top and with your thumb finger create a hole in the centre, forming the donut shape. Carefully slide the shaped vada into the hot oil. The strainer helps in giving the vada a uniform and round shape. When using a tea strainer or any utensil with water, it's crucial to be cautious about splattering when placing the vadas in hot oil.
- Adding onions to the Medu Vada batter is optional but it adds a nice taste to the vada. Adding green chilly to the Medu Vada batter is indeed flexible and can be adapted based on personal preferences. Chopping the green chillies and incorporating them along with other ingredients like ginger and spices is a common practice. This allows for visible pieces of green chilli in the batter, which adds heat to the vadas. I prefer to grind the green chilli with the batter to evenly distribute heat throughout the vada. It ensures that each bite has a consistent level of spiciness.
- Adding whole black pepper to the batter for medu vada is a common practice. Peppercorns tend to burst when exposed to high heat, such as during frying in hot oil. So, I chose to omit whole peppercorns from the batter to avoid this risk.